Installing and setting up the WordPress website is a very difficult task for any beginner user. You will need to perform a lot of things to set up WordPress website including, installing and configuring Apache, installing PHP, installing and configuring databases, and configuring the firewall.
You can automate the WordPress deployment process with the help of the Ansible. Server automation is an essential role for any system administrator. Ansible offers a simple architecture to automate the server deployment on hundreds or thousands of servers at a time.
In this tutorial, we will learn how to install and set up the WordPress website using Ansible on CentOS 8.
Prerequisites
- One Ansible control node: A server running CentOS 8 with Ansible installed and configured. To set up Ansible, please follow my guide on How to Install and Setup Ansible.
- One Ansible Target node: A fresh server running CentOS 8.
- A valid domain name pointed with your server IP. In this tutorial, we will use wp.example.com.
Step 1: Create a Directory Structure
First, you will need to create a directory structure for the Ansible where all of your configurations will be stored.
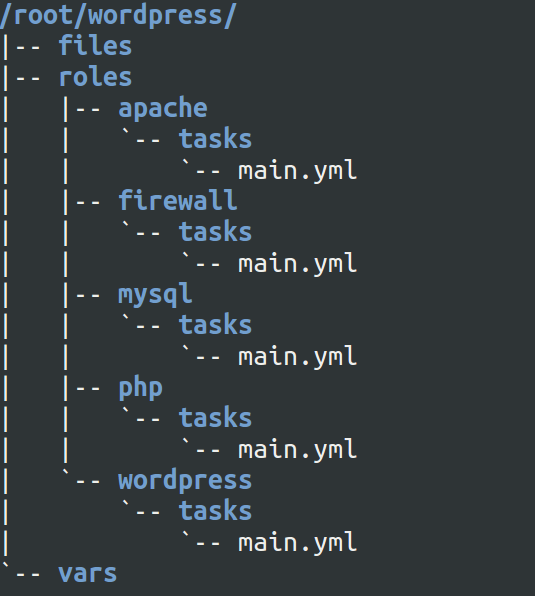
You can run the following commands to create a directory structure:
1 2 3 4 5 | mkdir ~/wordpresscd ~/wordpressmkdir roles vars filescd rolesmkdir -p apache/tasks php/tasks mysql/tasks wordpress/tasks firewall/tasks |
After running the above commands. Your directory structure should look like the following:
1 | tree ~/wordpress/ |
You should see the tree view of your directory structure.
01 02 03 04 05 06 07 08 09 10 11 12 13 14 | /root/wordpress/├── files├── roles│ ├── apache│ │ └── tasks│ ├── firewall│ │ └── tasks│ ├── mysql│ │ └── tasks│ ├── php│ │ └── tasks│ └── wordpress│ └── tasks└── vars |
Step 2: Create an Inventory File
Next, you will need to create an inventory file to define your Target host. You can create it with the following command:
1 | nano ~/wordpress/inventory.txt |
Add the following lines:
1 | target1 ansible_host=192.168.0.11 ansible_user=root ansible_ssh_pass=admin@123 |
Save and close the file when you are finished.
Where:
- ansible_host is the IP address of the Target host.
- ansible_user is the root user of the Target host.
- ansible_ssh_pass is the password of the root user on the Target host.
Step 3: Create an Ansible Variable
Next, you will need to define a variable to store the information about common things including, MySQL user, Apache host, Port, Password, PHP extensions, etc. You can define the variables inside the vars file as shown below:
1 | nano ~/wordpress/vars/default.yml |
Add the following lines:
01 02 03 04 05 06 07 08 09 10 11 12 13 | #PHP Settingsphp_modules: [ 'php', 'php-curl', 'php-gd', 'php-mbstring', 'php-xml', 'php-xmlrpc', 'php-soap', 'php-intl', 'php-zip' ]#MySQL Settingsmysql_root_password: "your-root-password"mysql_db: "wpdb"mysql_user: "wpuser"mysql_password: "password"#HTTP Settingshttp_host: "wp.example.com"http_conf: "wp.example.com.conf"http_port: "80" |
Save and close the file when you are finished.
Where:
- php_modules is the list of all PHP modules required for WordPress.
- mysql_root_password is the MySQL root password that you want to set.
- mysql_db is the database name of WordPress that you want to create.
- mysql_user is the database user name of WordPress that you want to create.
- mysql_password is the password of the MySQL user that you want to set.
- http_host is the FQDN name of your WordPress website.
- http_conf is the name of the WordPress configuration file.
- http_port is the port of the Apache webserver.
Step 4: Create an Apache Virtual Host Template File
Next, you will need to create a template for Apache virtual host configuration. Ansible will copy this template file to the Target host.
You can create it inside the files directory:
1 | nano ~/wordpress/files/httpd.conf |
Add the following lines:
01 02 03 04 05 06 07 08 09 10 11 12 13 14 | <VirtualHost *:{{ http_port }}> ServerAdmin webmaster@localhost ServerName {{ http_host }} ServerAlias www.{{ http_host }} DocumentRoot /var/www/{{ http_host }}/wordpress ErrorLog /var/log/httpd/error.log CustomLog /var/log/httpd/access.log combined <Directory /var/www/{{ http_host }}/wordpress> Options Indexes FollowSymLinks AllowOverride all Require all granted </Directory></VirtualHost> |
Save and close the file when you are finished.
Step 5: Create a Playbook for Apache Roles
Next, you will need to create a playbook for the Apache role to install and configure Apache on the Target host. This playbook will do the following things:
- Install the Apache package.
- Start the Apache service and enable it to start at boot.
- Create an Apache web root directory.
- Copy the Apache virtual host configuration template file from the Ansible control machine to the Ansible Target host.
You can create it inside the tasks directory as shown below:
1 | nano ~/wordpress/roles/apache/tasks/main.yml |
Add the following lines:
01 02 03 04 05 06 07 08 09 10 11 12 13 14 15 16 17 18 19 20 21 | - name: Install HTTP Packages yum: name=httpd update_cache=yes state=latest- name: Start httpd service systemd: name=httpd state=started enabled=yes- name: Create Apache Document Root file: path: "/var/www/{{ http_host }}" state: directory owner: "apache" group: "apache" mode: '0755'- name: Set up Apache VirtualHost template: src: "files/httpd.conf" dest: "/etc/httpd/conf.d/{{ http_conf }}" owner: root group: root mode: u=rw,g=r,o=r |
Save and close the file when you are finished.
Step 6: Create a Playbook for PHP Role
Next, you will need to create a playbook for the PHP role to install PHP and required PHP modules on the Target host. This playbook will do the following things:
- Install PHP Remi repository.
- Reset the default PHP repository and enable the Remi repository.
- Install PHP and required modules.
You can create a playbook for PHP with the following command:
1 | nano ~/wordpress/roles/php/tasks/main.yml |
Add the following lines:
01 02 03 04 05 06 07 08 09 10 | - name: Install PHP Remi Repository yum: name=https://rpms.remirepo.net/enterprise/remi-release-8.rpm update_cache=yes state=latest- name: Enable PHP Remi Repository command: dnf module reset php -y command: dnf module enable php:remi-7.4 -y- name: Install PHP Extensions yum: name={{ item }} update_cache=yes state=latest loop: "{{ php_modules }}" |
Save and close the file when you are finished.
Step 7: Create a Playbook for MySQL Role
Next, you will need to create a playbook for MySQL role to install and configure MySQL database on the Target host. This playbook will do the following things:
- Install MySQL and other packages.
- Start the MySQL service and enable it to start at boot.
- Set the MySQL root password.
- Create a database for WordPress.
- Create a database user for WordPress.
You can create a playbook for MySQL with the following command:
1 | nano ~/wordpress/roles/mysql/tasks/main.yml |
Add the following lines:
01 02 03 04 05 06 07 08 09 10 11 12 13 14 15 16 17 18 19 20 21 22 23 24 25 26 27 28 29 30 31 32 | # MySQL Configuration - name: Install MySQL Packages yum: name={{ item }} update_cache=yes state=latest loop: [ 'mysql-server', 'php-mysqlnd', 'python3-PyMySQL' ] - name: Start mysqld service systemd: name=mysqld state=started enabled=yes - name: Set MySQL root Password mysql_user: login_host: 'localhost' login_user: 'root' login_password: '' name: 'root' password: '{{ mysql_root_password }}' state: present - name: Creates database for WordPress mysql_db: name: "{{ mysql_db }}" state: present login_user: root login_password: "{{ mysql_root_password }}" - name: Create MySQL user for WordPress mysql_user: name: "{{ mysql_user }}" password: "{{ mysql_password }}" priv: "{{ mysql_db }}.*:ALL" state: present login_user: root login_password: "{{ mysql_root_password }}" |
Save and close the file when you are finished.
Step 8: Create a Playbook for WordPress Role
Next, you will need to create a playbook for WordPress role to download and configure WordPress on the Target host. This playbook will do the following things:
- Download and extract WordPress to the Apache web root directory.
- Set ownership for WordPress.
- Set permissions for directories.
- Set permissions for files.
- Rename WordPress sample configuration file.
- Define database settings in the WordPress configuration file.
- Restart the Apache service.
You can create a playbook for WordPress with the following command:
1 | nano ~/wordpress/roles/wordpress/tasks/main.yml |
Add the following lines:
01 02 03 04 05 06 07 08 09 10 11 12 13 14 15 16 17 18 19 20 21 22 23 24 25 26 27 28 29 30 31 32 33 34 35 36 37 38 39 40 | # WordPress Configuration - name: Download and unpack latest WordPress unarchive: src: https://wordpress.org/latest.tar.gz dest: "/var/www/{{ http_host }}" remote_src: yes creates: "/var/www/{{ http_host }}/wordpress" - name: Set ownership file: path: "/var/www/{{ http_host }}" state: directory recurse: yes owner: apache group: apache - name: Set permissions for directories shell: "/usr/bin/find /var/www/{{ http_host }}/wordpress/ -type d -exec chmod 750 {} \\;" - name: Set permissions for files shell: "/usr/bin/find /var/www/{{ http_host }}/wordpress/ -type f -exec chmod 640 {} \\;" - name: Copy sample config file command: mv /var/www/{{ http_host }}/wordpress/wp-config-sample.php /var/www/{{ http_host }}/wordpress/wp-config.php creates=/var/www/{{ http_host }}/wordpress/wp-config.php become: yes - name: Update WordPress config file lineinfile: path: "/var/www/{{ http_host }}/wordpress/wp-config.php" regexp: "{{item.regexp}}" line: "{{item.line}}" with_items: - {'regexp': "define\\( 'DB_NAME', '(.)+' \\);", 'line': "define( 'DB_NAME', '{{mysql_db}}' );"} - {'regexp': "define\\( 'DB_USER', '(.)+' \\);", 'line': "define( 'DB_USER', '{{mysql_user}}' );"} - {'regexp': "define\\( 'DB_PASSWORD', '(.)+' \\);", 'line': "define( 'DB_PASSWORD', '{{mysql_password}}' );"} - name: Restart httpd service systemd: name=httpd state=restarted become: yes |
Save and close the file when you are finished.
Step 9: Create a Playbook for Firewall Role
Next, you will need to create a playbook for Firewall role to disable the SELinux and configure Firewall on the Target host. This playbook will do the following things:
- Disable the SELinux.
- Disable the SELinux on the fly.
- Configure the firewall to allow Apache service.
- Reload the firewall rules.
You can create a playbook for the firewall with the following command:
1 | nano ~/wordpress/roles/firewall/tasks/main.yml |
Add the following lines:
01 02 03 04 05 06 07 08 09 10 11 12 | # Firewall Configuration - name: Disable SELinux Permanently (Reboot Required) selinux: state=disabled - name: Disable SELinux Without Reboot command: /sbin/setenforce 0 - name: Configure Firewall firewalld: zone=public service=http permanent=yes state=enabled - name: Reload Firewall systemd: name=firewalld state=reloaded |
Save and close the file when you are finished.
Step 10: Create a Main Playbook
Next, you will need to create a main playbook at the top of your project. This playbook includes all roles and variables that we have created earlier.
You can create a main playbook.yml file inside the ~/wordpress project directory:
1 | nano ~/wordpress/playbook.yml |
Add the following lines:
01 02 03 04 05 06 07 08 09 10 11 | - hosts: target1 gather_facts: False become: true vars_files: - vars/default.yml roles: - apache - php - mysql - wordpress - firewall |
Save and close the file when you are finished.
Step 11: Run the Ansible Playbook
I hope you have performed all the above steps correctly. Now, change the directory to your ~/wordpress project and run the Ansible playbook with the following command:
1 2 | cd ~/wordpressansible-playbook playbook.yml -i inventory.txt |
This will install WordPress into your Target hosts. Once the playbook has been executed successfully, you should get the following output:
01 02 03 04 05 06 07 08 09 10 11 12 13 14 15 16 17 18 19 20 21 22 23 24 25 26 27 28 29 30 31 32 33 34 35 36 37 38 39 40 41 42 43 44 45 46 47 48 49 50 51 52 53 54 55 56 57 58 59 60 61 62 63 64 65 66 67 68 69 70 71 72 73 74 75 76 77 78 79 80 81 82 83 84 85 86 87 88 89 | PLAY [target1] ********************************************************************************************************************************TASK [apache : Install HTTP Packages] *********************************************************************************************************ok: [target1]TASK [apache : Start httpd service] ***********************************************************************************************************ok: [target1]TASK [apache : Create Apache Document Root] ***************************************************************************************************ok: [target1]TASK [apache : Set up Apache VirtualHost] *****************************************************************************************************ok: [target1]TASK [php : Install PHP Remi Repository] ******************************************************************************************************ok: [target1]TASK [php : Enable PHP Remi Repository] *******************************************************************************************************changed: [target1]TASK [php : Install PHP Extensions] ***********************************************************************************************************changed: [target1] => (item=php)ok: [target1] => (item=php-curl)changed: [target1] => (item=php-gd)ok: [target1] => (item=php-mbstring)ok: [target1] => (item=php-xml)changed: [target1] => (item=php-xmlrpc)changed: [target1] => (item=php-soap)changed: [target1] => (item=php-intl)changed: [target1] => (item=php-zip)TASK [mysql : Install MySQL Packages] *********************************************************************************************************changed: [target1] => (item=mysql-server)changed: [target1] => (item=php-mysqlnd)changed: [target1] => (item=python3-PyMySQL)TASK [Start mysqld service] *******************************************************************************************************************changed: [target1]TASK [mysql : Set MySQL root Password] ********************************************************************************************************changed: [target1]TASK [mysql : Creates database for WordPress] *************************************************************************************************changed: [target1]TASK [mysql : Create MySQL user for WordPress] ************************************************************************************************changed: [target1]TASK [wordpress : Download and unpack latest WordPress] ***************************************************************************************changed: [target1]TASK [wordpress : Set ownership] **************************************************************************************************************changed: [target1]TASK [wordpress : Set permissions for directories] ********************************************************************************************changed: [target1]TASK [wordpress : Set permissions for files] **************************************************************************************************changed: [target1]TASK [wordpress : Copy sample config file] ****************************************************************************************************changed: [target1]TASK [wordpress : Update WordPress config file] ***********************************************************************************************changed: [target1] => (item={'regexp': "define\\( 'DB_NAME', '(.)+' \\);", 'line': "define( 'DB_NAME', 'wpdb' );"})changed: [target1] => (item={'regexp': "define\\( 'DB_USER', '(.)+' \\);", 'line': "define( 'DB_USER', 'wpuser' );"})changed: [target1] => (item={'regexp': "define\\( 'DB_PASSWORD', '(.)+' \\);", 'line': "define( 'DB_PASSWORD', 'password' );"})TASK [wordpress : Restart httpd service] ******************************************************************************************************changed: [target1]PLAY RECAP ************************************************************************************************************************************target1 : ok=19 changed=14 unreachable=0 failed=0 skipped=0 rescued=0 ignored=0 PLAY [target1] ********************************************************************************************************************************TASK [firewall : Disable SELinux Permanently (Reboot Required)] *******************************************************************************changed: [target1]TASK [firewall : Disable SELinux Without Reboot] **********************************************************************************************changed: [target1]TASK [firewall : Configure Firewall] **********************************************************************************************************changed: [target1]TASK [firewall : Reload Firewall] *************************************************************************************************************changed: [target1]PLAY RECAP ************************************************************************************************************************************target1 : ok=4 changed=4 unreachable=0 failed=0 skipped=0 rescued=0 ignored=0 |
Step 12: Access WordPress Installation Wizard
At this point, WordPress has been installed on the Target host. Now, open your web browser and type the URL https://wp.example.com. You will be redirected to the WordPress installation screen:

Select your desired language and click on the Continue button. You should see the following screen:
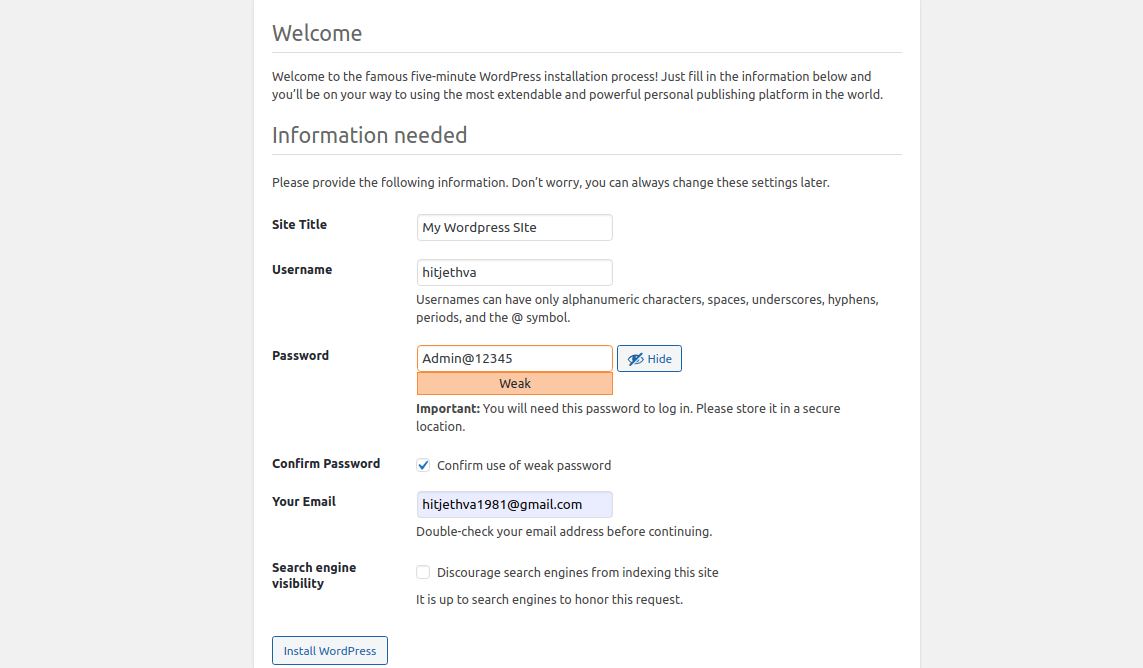
Provide your Sitename, Username, Password, Email, and click on the Install WordPress button. Once the installation is completed, you should see the following screen:
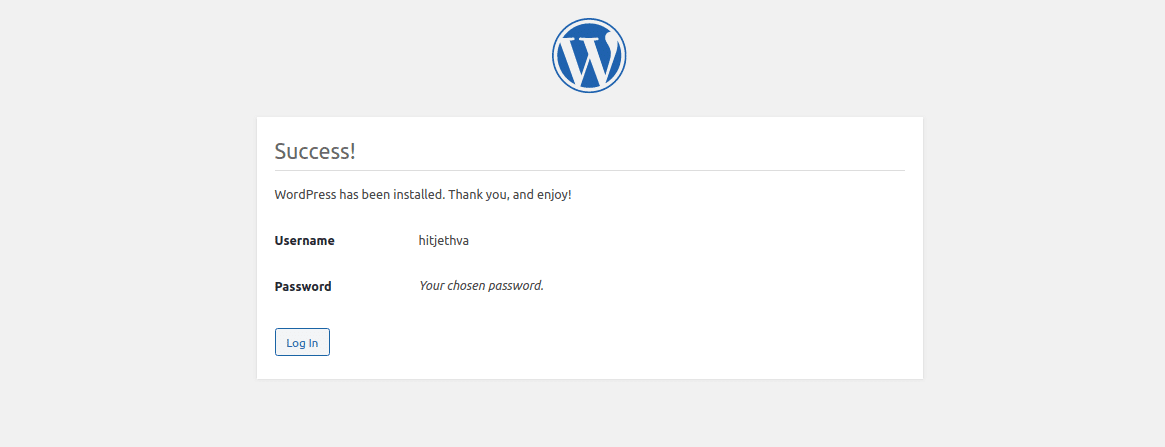
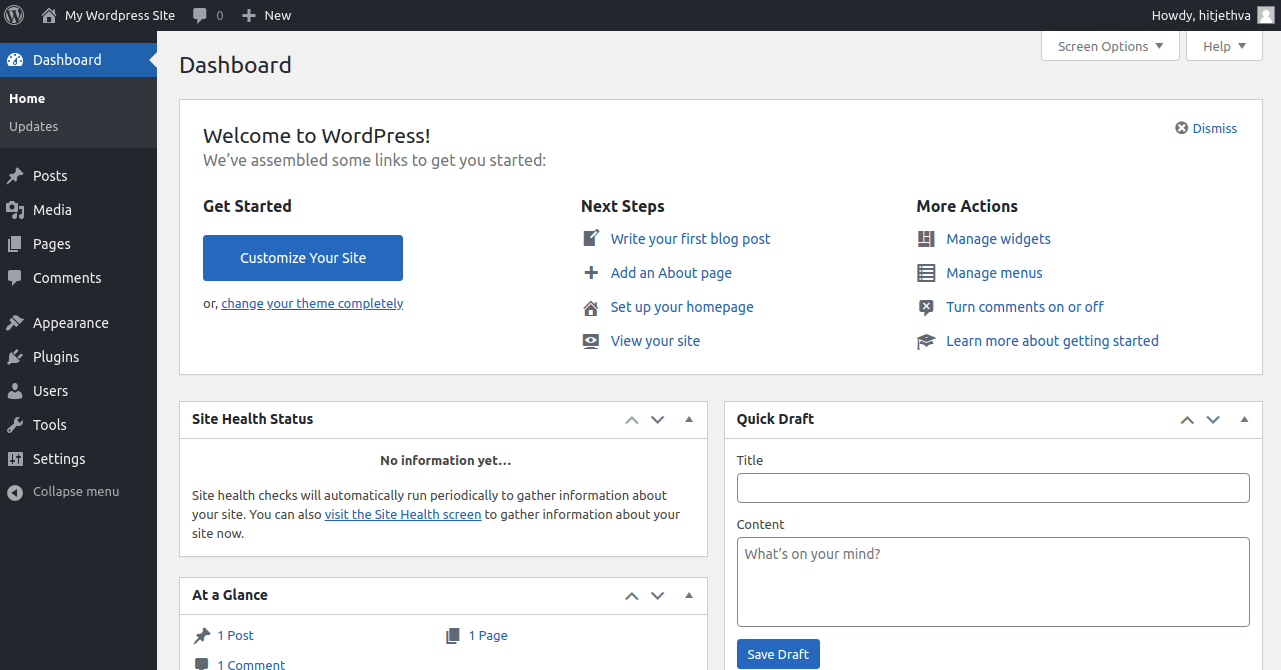
Click on the Log In button. You will be redirected to the WordPress login page:
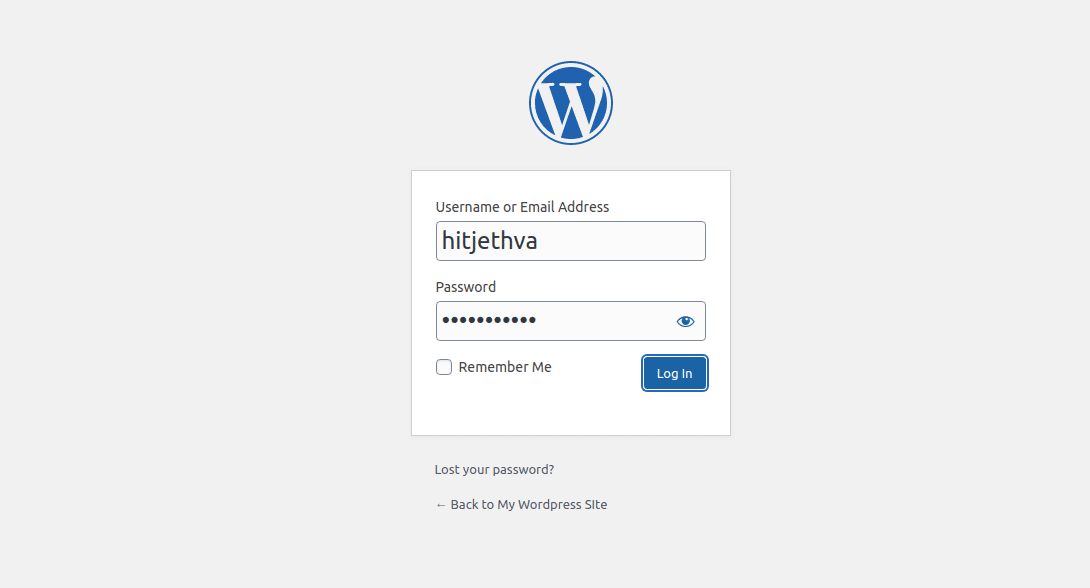
Provide your admin username, password, and click on the Log In button. You should see the WordPress default dashboard in the following screen: