
In this section, we will be going to look at what is Ansible variables? and how we can use a variable in Ansible Playbook.
What is Ansible Variables?
Just like in any other scripting or programming language, variables are used to store values that vary with different items.
For example, let’s say we are trying to perform the same operation of applying patches to hundreds of servers we only need a single playbook for all hundred servers. However, it’s the variables that store the information about the different hostnames, usernames, or passwords that are used to connect to each of these servers. We have already worked with variables earlier when we worked in the inventory section.
If you remember an inventory file that looks like this:
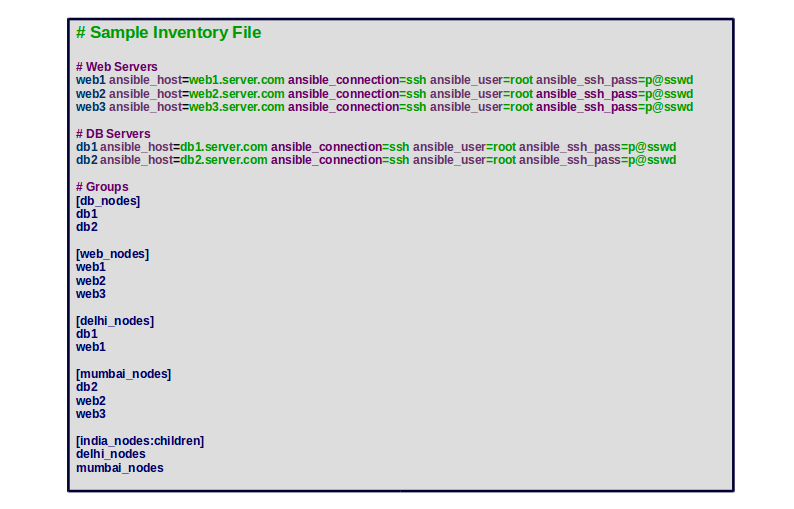
As you can see the ansible_host, ansible_connection and ansible_ssh_pass are all examples of variables. We can define as many variables as required like this.
There are a lot of built-in variables available in Ansible that can be used to provide system information such as hostname, system architecture, interfaces, etc.
A valid Ansible variable names should be letters, numbers, and underscores should always start with a letter and should not contain any spaces.
Valid Ansible Variable Names
- hiteshjethva
- hitesh_jethva
- hiteshjethva1981
- hitesh_81
Non-valid Ansible Variable Names
- hitesh-jethva
- linux buz
- 91hitesh
- 1981
For more information about Ansible variables, check out the Ansible variable documentation.
Ansible Variables Use Cases
Let’s look at different use cases of Variables in Ansible
Variables in Playbook
We could also define the variables inside the playbook. We can access the value of the variable by placing it between the double curly braces enclosed with quotation marks.
Let’s take a look at simple playbook shown below:
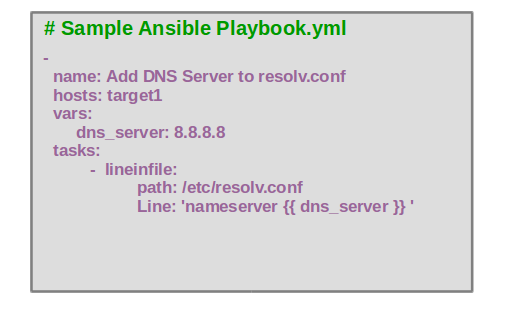
As you can see, we have defined dns_server variable inside vars and use the variable dns_server in double braces. When we run the playbook, ansible will replace it with the value in the variable.
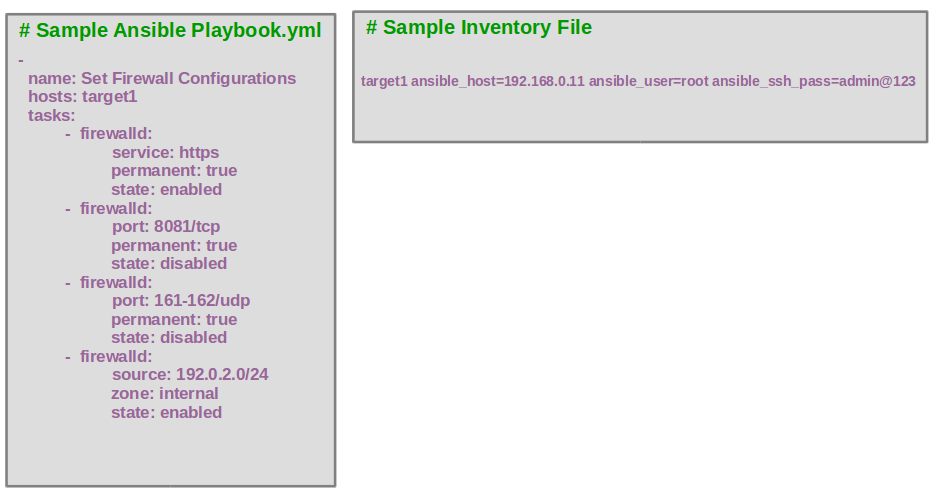
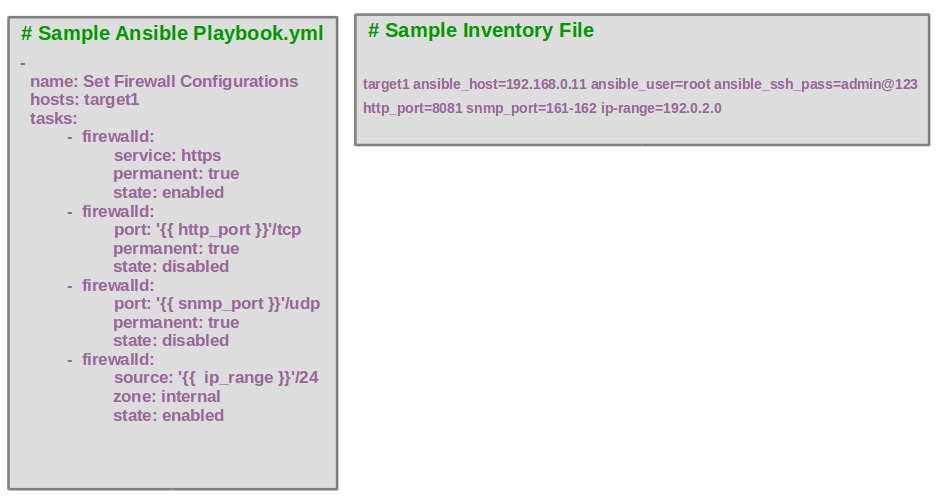
Let’s take another example. This is a longer playbook that is used to set multiple firewall configurations that have a number of values hard-coded in it. If someone else wanted to reuse this playbook he would have to modify the playbook to change these values. If these values that can vary are moved to the inventory file and referred to in the playbook using the double curly braces. We could away with modifying the inventory file alone in the future.
Sample Ansible Playbook and Inventory File without Variables
Sample Ansible Playbook and Inventory File with Variables
Variables with Arrays
we can also use arrays and assign them to variables as shown in the syntax below:
1 2 3 4 | vars: arrayname: – value1 – value2 |
For example, the playbook shown below contains an array of 5 student names stored in a variable called students. We can retrieve the name jayesh from the array list using the students [3]:
01 02 03 04 05 06 07 08 09 10 11 12 13 | - hosts: all vars: students: - Hitesh - Jayesh - Vyom - Disha - Ninav tasks: - name: Ansible List variable Example debug: msg: "{{ students[3] }}" |
Variables with Dictionaries
We can further define each of the entries using a key-value pair forming what we call a dictionary list using the following syntax:
01 02 03 04 05 06 07 08 09 10 | vars: arrayname: dictionary_name1: value1: itemvalue1 value2: itemvalue2 dictionary_name2: value1: itemvalue1 value2: itemvalue2 |
Using our previous example, we can have dictionary lists below:
01 02 03 04 05 06 07 08 09 10 11 12 13 | - hosts: all vars: students: - Hitesh: city: Junagadh address: 362002 - Ninav: city: Ahmedabad address: 362003 tasks: - debug: var: students |
Variables in Inventory Files
In the inventory file, you can assign a variable to a host system and later use it in a playbook.
If you have different servers that share similar attributes or values, you can define them using the group variables. These are used to assign the attributes which are common to all the servers.
For example, Let’s assume we have two servers target1 and target2 which have same SSH username, port, and password then the inventory file will appear as shown below:
1 2 3 4 5 6 7 8 | [target]target1 ansible_host=192.168.0.11target2 ansible_host=192.168.0.12[target:vars]ansible_port=22ansible_user=root ansible_password=admin@123 |
Special Variables
Ansible comes with a lot of predefined variables and these are gathered when a playbook is executed.
You can get a list of all the Ansible variables, run the following command:
1 | ansible -m setup localhost |
You should see the list of all pre-defined variables in JSON format as shown below:
01 02 03 04 05 06 07 08 09 10 11 12 13 14 15 16 17 18 19 20 21 22 23 24 25 26 27 28 29 30 31 32 33 34 35 36 37 38 | localhost | SUCCESS => { "ansible_facts": { "ansible_all_ipv4_addresses": [ "45.58.32.179" ], "ansible_all_ipv6_addresses": [ "fe80::200:2dff:fe3a:20b3", "fe80::200:aff:fe3a:20b3" ], "ansible_apparmor": { "status": "disabled" }, "ansible_architecture": "x86_64", "ansible_bios_date": "04/01/2014", "ansible_bios_version": "1.10.2-1ubuntu1", "ansible_cmdline": { "BOOT_IMAGE": "(hd0,msdos1)/boot/vmlinuz-4.18.0-147.5.1.el8_1.x86_64", "console": "tty0", "ro": true, "root": "UUID=b9682000-d932-4e30-b163-08088e215a03" }, "ansible_date_time": { "date": "2020-07-31", "day": "31", "epoch": "1596191206", "hour": "06", "iso8601": "2020-07-31T10:26:46Z", "iso8601_basic": "20200731T062646608776", "iso8601_basic_short": "20200731T062646", "iso8601_micro": "2020-07-31T10:26:46.609146Z", "minute": "26", "month": "07", "second": "46", "time": "06:26:46", "tz": "EDT", "tz_offset": "-0400", "weekday": "Friday", "weekday_number": "5", |
Ansible Variables Exercise
Now go ahead and get your hands dirty developing some Ansible playbooks using the Ansible variables we learned above.
Exe 1 :- Define a variable name “filename” in playbook.yml and its value “linuxbuz“. Then, use the file module to create a file on the localhost according to a variable.
Ans : Create a new playbook.yml file inside the directory using the following command:
1 2 | cd Ansible_projectnano playbook.yml |
Add the following contents:
1 2 3 4 5 6 | - hosts: localhost vars: - filename: linuxbuz tasks: - name: Create a file file: path=/opt/{{ filename }}.txt state=touch |
Save and close the file then run the playbook with the following command:
1 | ansible-playbook playbook.yml |
You should get the following output:
01 02 03 04 05 06 07 08 09 10 | PLAY [localhost] ******************************************************************************************************************************TASK [Gathering Facts] ************************************************************************************************************************ok: [localhost]TASK [Create a file] **************************************************************************************************************************changed: [localhost]PLAY RECAP ************************************************************************************************************************************localhost : ok=2 changed=1 unreachable=0 failed=0 skipped=0 rescued=0 ignored=0 |
Exe 2 :- Define a variable name “filename” in playbook.yml and store multiple values. Then, use the debug module to display a specific file stored from the variables.
Ans : Create a new playbook.yml file inside the Ansible_project directory using the following command:
1 2 | cd Ansible_projectnano playbook.yml |
Add the following contents:
01 02 03 04 05 06 07 08 09 10 11 12 | - hosts: localhost vars: filename: - linuxbuz0 - linuxbuz1 - linuxbuz2 - linuxbuz3 tasks: - name: List specific file debug: msg: "{{ filename[3] }}" |
Save and close the file then run the playbook with the following command:
1 | ansible-playbook playbook.yml |
You should get the following output:
01 02 03 04 05 06 07 08 09 10 11 12 | PLAY [localhost] ******************************************************************************************************************************TASK [Gathering Facts] ************************************************************************************************************************ok: [localhost]TASK [List specific file] *********************************************************************************************************************ok: [localhost] => { "msg": "linuxbuz3"}PLAY RECAP ************************************************************************************************************************************localhost : ok=2 changed=0 unreachable=0 failed=0 skipped=0 rescued=0 ignored=0 |
Exe 3 :- Define three variables in playbook.yml. First is the web_root and set value /var/www/htm/, and create a directory using variable “ansible_hostname“. The second variable is index_file and set value index.html, and create an index.html file. The third variable is index_msg and set value “Welcome to Linuxbuz“.
Ans : Create a new playbook.yml file inside the Ansible_project directory using the following command:
1 2 | cd Ansible_projectnano playbook.yml |
Add the following contents:
01 02 03 04 05 06 07 08 09 10 11 12 | - hosts: localhost vars: web_root: /var/www/html/ index_file: index.html index_msg: "Welcome to Linuxbuz" tasks: - name: Create directory using Variable file: path="{{ web_root }}{{ ansible_hostname }}" state=directory - name: Create index file using Variable file: path="{{ web_root }}{{ ansible_hostname }}/{{ index_file }}" state=touch - name: Write Message in index file shell: echo {{ index_msg }} >> "{{ web_root }}{{ ansible_hostname }}/{{ index_file }}" |
Save and close the file then run the playbook with the following command:
1 | ansible-playbook playbook.yml |
You should get the following output:
01 02 03 04 05 06 07 08 09 10 11 12 13 14 15 16 | PLAY [localhost] ******************************************************************************************************************************TASK [Gathering Facts] ************************************************************************************************************************ok: [localhost]TASK [Create directory using Variable] ********************************************************************************************************changed: [localhost]TASK [Create index file using Variable] *******************************************************************************************************changed: [localhost]TASK [Write Message in index file] ************************************************************************************************************changed: [localhost]PLAY RECAP ************************************************************************************************************************************localhost : ok=4 changed=3 unreachable=0 failed=0 skipped=0 rescued=0 ignored=0 |
We will learn more about Ansible Variables in my “Ansible for Advance” course.
Once you are finished, you can proceed to the next chapter.