
What is Ansible Inventory?
Ansible can work with multiple systems in your infrastructure at the same time. In order to work with multiple servers, Ansible needs to establish connectivity to those servers. This is done with SSH for Linux and PowerShell remoting for windows that would make Ansible agentless. Agentless means you don’t need to install any additional software on the Target machines to be able to work with Ansible. One of the major disadvantages of other automation tools is that you need to install and configure agents on the Target machines before you can invoke any kind of automation. Now the information about these Target systems is stored in a file called an inventory file. If you don’t create a new inventory file Ansible uses its default inventory file located at /etc/ansible/hosts.
LAB 1 : Ansible Inventory
Before starting, you will need to check the connectivity between the Ansible Controller and Targets.
On the Ansible Controller machine, run the ping command to test the connectivity:
1 2 | ping 192.168.0.11ping 192.168.0.12 |
We will now perform a simple test to check the connectivity between the Ansible Controller and Target machines. Before starting, you will need to disable SSH key host checking on the Ansible Controller machine. You can disable it by editing the file /etc/ansible/ansible.cfg.
On the Ansible Controller machine, log in with root user and edit the ansible.cfg file as shown below:
1 | nano /etc/ansible/ansible.cfg |
Uncomment the following line:
1 | host_key_checking = False |
Save and close the file when you are finished. Next, create a new project name Ansible_project in your root directory:
1 | mkdir ~/Ansible_project |
Next, change the directory to Ansible_project and create an inventory file named inventory.txt:
1 2 | cd Ansible_projectnano inventory.txt |
Add your Target1 machine’s IP address, SSH user and password details as shown below:
1 | target1 ansible_host=192.168.0.11 ansible_user=root ansible_ssh_pass=admin@123 |
Save and close the file when you are finished. Now, we have an inventory file with IP address of my Target1 server, user, and password. I can now run a check by running the Ansible command and the name of Target machine which is Target1, and specify a module called ping which is used to run a ping test, and specify an inventory file with -i option:
1 | ansible target1 -m ping -i inventory.txt |
If everything is fine you should see the following output:
1 2 3 4 5 6 7 | target1 | SUCCESS => { "ansible_facts": { "discovered_interpreter_python": "/usr/libexec/platform-python" }, "changed": false, "ping": "pong"} |
This command will perform a ping test and make sure it can establish successful connectivity to the Target machine. In this case, it says SUCCESS and comes back with a pong message that means the Ansible Controller machine can successfully communicate with the Targate1 machine.
Next, edit the inventory.txt file again and add the information about the Target2 machine:
1 | nano inventory.txt |
Add the information about Target2 machine as shown below:
1 2 | target1 ansible_host=192.168.0.11 ansible_user=root ansible_ssh_pass=admin@123target2 ansible_host=192.168.0.12 ansible_user=root ansible_ssh_pass=admin@123 |
Save and close the file when you are finished. Now, try to test for Target2 machine as shown below:
1 | ansible target2 -m ping -i inventory.txt |
You can now see the response with pong as shown below:
1 2 3 4 5 6 7 | target2 | SUCCESS => { "ansible_facts": { "discovered_interpreter_python": "/usr/libexec/platform-python" }, "changed": false, "ping": "pong"} |
You can use the parameter all with Ansible command to perform ping test on all servers listed in the inventory.txt file:
1 | ansible all -m ping -i inventory.txt |
You should see the pong response from both target machines:
01 02 03 04 05 06 07 08 09 10 11 12 13 14 | target2 | SUCCESS => { "ansible_facts": { "discovered_interpreter_python": "/usr/libexec/platform-python" }, "changed": false, "ping": "pong"}target1 | SUCCESS => { "ansible_facts": { "discovered_interpreter_python": "/usr/libexec/platform-python" }, "changed": false, "ping": "pong"} |
To list all the hosts in the inventory file, you can run the below command
1 | ansible all --list-hosts -i inventory.txt |
You should see all hosts defined in the inventory file in the following output:
1 2 3 | hosts (2): target1 target2 |
Note : Using a password with SSH is not a recommended way in a production environment. Use SSH key-based authentication is a better way to establish a connection between multiple servers. We will learn about SSH key-based authentication in my “Ansible for Advance” course.
Ansible Inventory Exercise
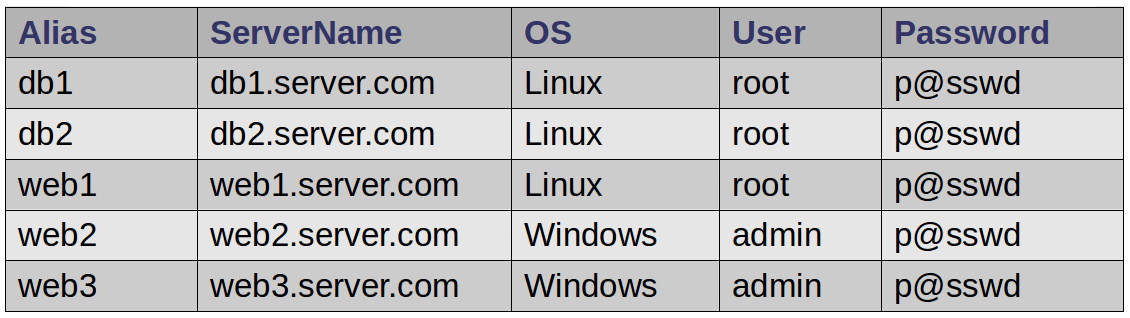
- Create an inventory file using the data given in the below table.
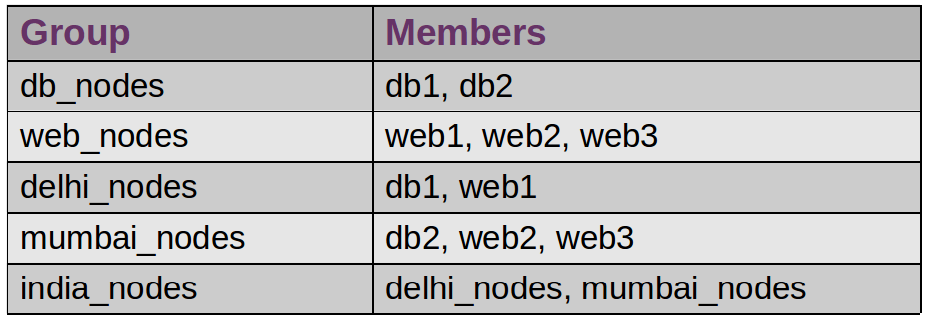
And group the servers together based on the below table.
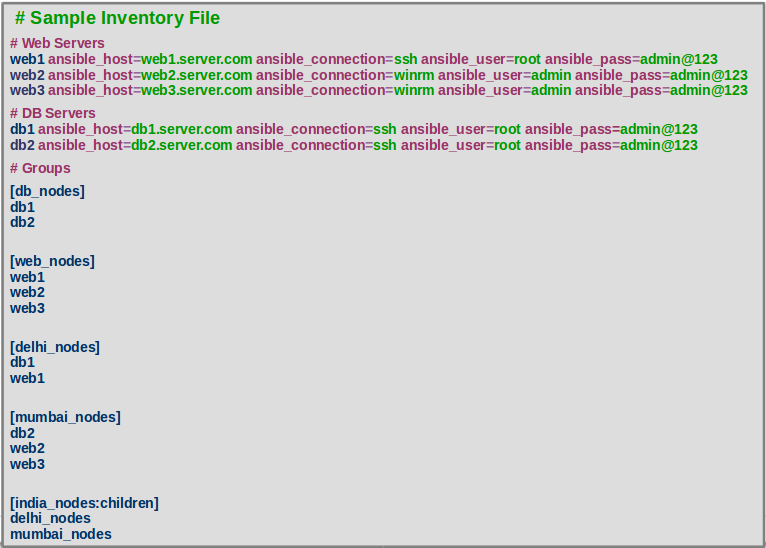
Solution:- You can see the sample inventory file in the following screenshot based on the above data:
Now, let’s play around with some question and answer based on the above inventory file:
Que 1 :- Perform ping test on all DB servers listed in the above inventory.txt file.
Ans. You can perform this by running the following command on Ansible Controller machine:
1 | ansible db_nodes -m ping -i inventory.txt |
Que 2 :- Perform a ping test on all servers listed in the above inventory.txt file.
Ans. You can perform this by running the following command on Ansible Controller machine:
1 | ansible all -m ping -i inventory.txt |
Que 3 :- Perform ping test on all servers available in mumbai_nodes using the above inventory.txt file.
Ans. You can perform this by running the following command on Ansible Controller machine:
1 | ansible mumbai_nodes -m ping -i inventory.txt |
Que 4 :- Perform ping test on all servers available in mumbai_nodes and delhi_nodes using the above inventory.txt file.
Ans. You can perform this by running the following command on Ansible Controller machine:
1 | ansible india_nodes -m ping -i inventory.txt |
After the successful completion of this chapter, you can proceed to the next chapter.