
What are Ansible Conditionals?
In this section, we are going to look at Ansible conditionals.
Conditionals are very important parts of any programming language to control the flow of execution. You can also use conditional statements in Ansible playbooks where there is a mix of different variables and each representing different entities.
Ansible has many useful parameters that can be used in tasks to specify a condition or pre-requisite to execute this task. When you are working on many remote hosts and their Operating systems are different then it is very important that only the tasks written for that particular condition must run on that else it will be ignored. Ansible conditionals help you to control the execution of a task or play based on the specific conditions.
Here, we have a sample inventory file and a sample playbook as shown below.
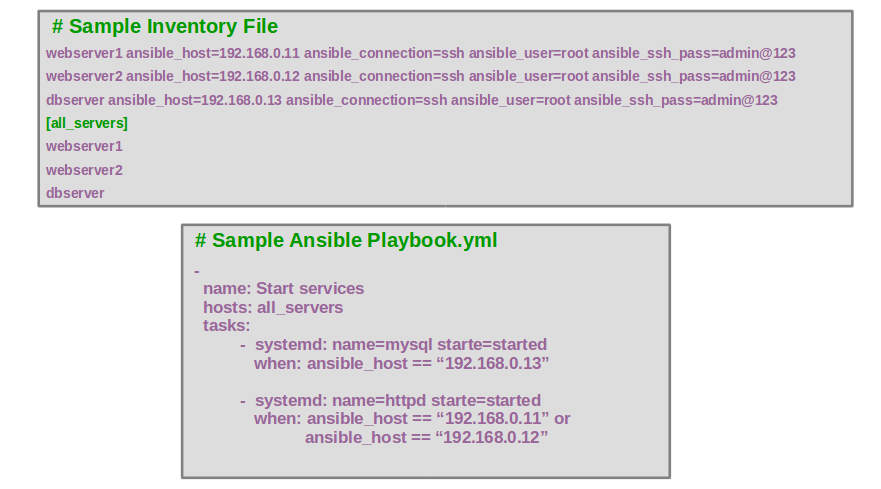
The inventory file contains two web servers named webserver1 and webserver2, and a database server named as dbserver. Note that we also have a group defined with a name all_servers and we have the webserver and dbserver inside it. We have a playbook that attempts to start all services in the database and webserver. And if you notice we are running this play against the all_servers group.
Now what would happen is Ansible will try to run this single playbook across all servers listed in the all_servers group. Which would mean Ansible will try to start the database service first and then the httpd service. However, we do not have database service on the webserver and we do not have httpd service on the database server.
What we want to do is add a condition to each task saying when we want the task run. For example, we would like to run MySQL service only if the host is a database server. Similarly, we would like to run the httpd service only if the host is webserver1 or webserver2.
Let’s look at another example. In this playbook, I would like to check the status of the httpd service and based on the result execute the next task. In this case, if the httpd service is down I would like to send an email to the system admin reporting this issue.
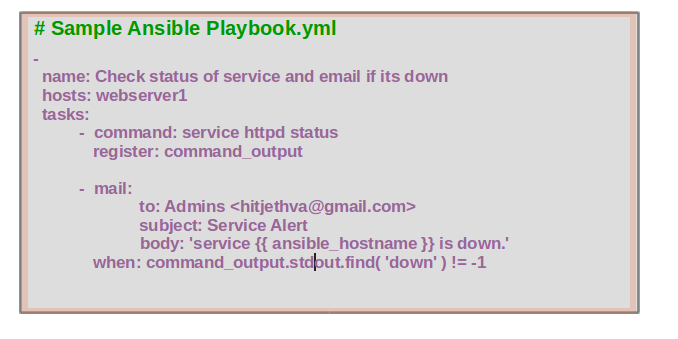
So note the mail module that a new module we haven’t learned before and it is used to sent mails. Check the documentation for additional information about the mail module.
So we have two tasks, the first one is for executing a command check the status of a service, the second one is to send an email. If we run it now, it will check the status of service irrespective of whether the service is up or down. We need to add a condition as we just learned. We will add a when condition to check the status of service but what it checks against, how do we get the result of the command run in the first task that where the register directive comes into play. Register can be used to register or store the output of a module. In this case, the output of the module command run will be stored in the variable named command_output. Next, we used that variable to check if the result contains the word down if its true we will send out an email. Remember the output of the command is stored in a key stdout inside the variable command_output.
What are Loops in Ansible?
Loops in Ansible provides an easier way for executing repetitive tasks using fewer lines of code in a playbook. You can repeat certain tasks until a condition is met with Loops.
Let’s take a look at this example. We are creating an Ansible playbook to install several packages in the target system using the yum module.
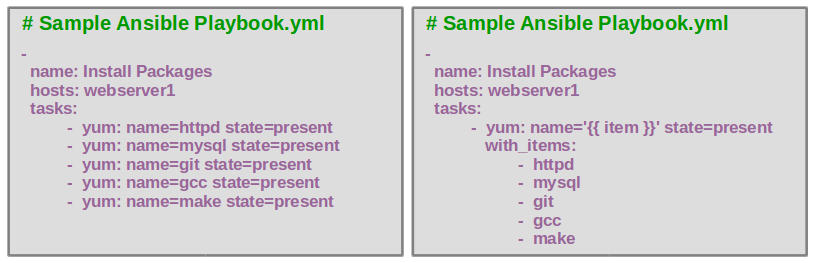
The yum module helps you install or remove packages using the yum package manager. We can install a single package using the yum module easily but what if we have multiple packages to install on the Target system. One way to do this would be to duplicate the lines with the yum module many times but that’s not very elegant. A better way to do this would be to have a single task loop over all the modules that we are use with_items. with_items is a loop interactive that executes the same task multiple times. Each time it runs, it stores the value of the item in the item variable.
Ansible Exercise
Now go ahead and get your hands dirty developing some Ansible playbooks using the modules we learned above. We will just go to get you familiar with advanced playbooks and playbook structures.
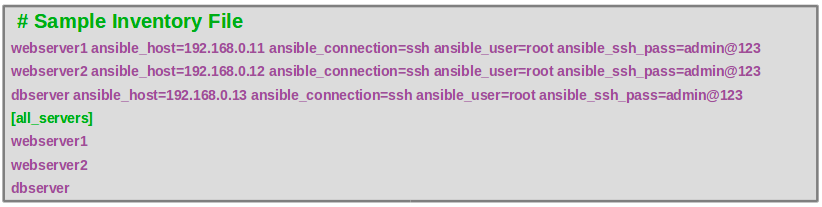
Use the inventory file shown in the below image and solve the following exercises:
Exe 1 :- Create multiple directories named dir1, dir2, dir3 inside /mnt directory with permission as 775 owner/group as root on the Target machines as mentioned in the inventory file and all_servers group.
Ans : Create a new playbook.yml file inside the Ansible_project directory using the following command:
1 2 | cd Ansible_projectnano playbook.yml |
Add the following contents:
1 2 3 4 5 6 7 8 | - hosts: all_servers tasks: - name: Create multiple directories file: path='{{item}}' state=directory mode=775 owner=root group=root with_items: - '/mnt/dir1' - '/mnt/dir2' - '/mnt/dir3' |
Save and close the file then run the playbook with the following command:
1 | ansible-playbook playbook.yml -i inventory.txt |
Exe 2 :- Stop multiple services named httpd, docker and ntp on webserver1 as mentioned in the inventory file.
Ans : Create a new playbook.yml file inside the Ansible_project directory using the following command:
1 2 | cd Ansible_projectnano playbook.yml |
Add the following contents:
1 2 3 4 5 6 7 8 | - hosts: webserver1 tasks: - name: Stop multiple services systemd: name='{{ item }}' state=stopped with_items: - 'httpd' - 'docker' - 'ntp' |
Save and close the file then run the playbook with the following command:
1 | ansible-playbook playbook.yml -i inventory.txt |
You will get an error if any of the above services is not available in the Target machines.
Note : Click here for more information about with_item module.
Exe 3 :- Create multiple users on dbserver group with the following details:
Username=db1 Password=db123 Group=wheel
Username=db2 Password=db123 Group=mysql,wheel
Ans : Create a new playbook.yml file inside the Ansible_project directory using the following command:
1 2 | cd Ansible_projectnano playbook.yml |
Add the following contents:
1 2 3 4 5 6 7 | - hosts: dbserver tasks: - name: Create multiple users user: name={{ item.name }} pass={{ item.pass }} groups={{ item.groups }} state=present with_items: - { name: db1, pass: db123, groups: wheel } - { name: db2, pass: db123, groups: "wheel, mysql" } |
Save and close the file then run the playbook with the following command:
1 | ansible-playbook playbook.yml -i inventory.txt |
Exe 4 : Install system updates on webserver1 if the operating system is CentOS, and on dbserver if the operating system is Ubuntu.
Ans : Create a new playbook.yml file inside the Ansible_project directory using the following command:
1 2 | cd Ansible_projectnano playbook.yml |
Add the following contents:
01 02 03 04 05 06 07 08 09 10 11 | - hosts: webserver1 tasks: - name: install system updates for centos systems yum: name=* state=latest update_cache=yes when: ansible_distribution == "CentOS"- hosts: dbserver tasks: - name: install system updates for ubuntu systems apt: upgrade=dist update_cache=yes when: ansible_distribution == "Ubuntu" |
Save and close the file then run the palybook with the following command:
1 | ansible-playbook playbook.yml -i inventory.txt |
when : This option performs their associated module per OS.
Note : Click here for more information about Ansible conditionals.
Once you are finished, you can proceed to the next chapter.