
What is Ansible Module?
Ansible modules are standalone scripts that can be used inside an Ansible playbook. You can use these modules to run whatever commands it needs to get its job done.
In this section, we are going to look at some additional Ansible modules in a bit more detail. This is required so we can practice developing some more meaningful playbooks.
Ansible modules are categorized into various groups based on their functionality. There are hundreds of Ansible modules are available. We have categorized all the modules as shown in the below image:
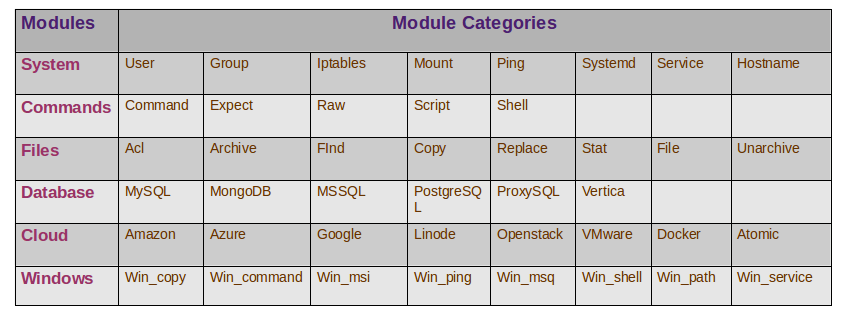
- System : System modules are actions to be performed at a system level such as modifying the users and groups on the system, modifying iptables and firewall configurations, working with logical volume groups, mounting operations and working with services.
- Command : Command module are used to execute command or script on the host. This could be a simple command using the command module or an interactive execution using expect by responding to prompts. You could also run a script on the host using the script module.
- Files : Files module will help in working with files. For example, using an ACL module to set an acl information on files, use the archive and unarchive module to compress and unpack files, use find, lineinfile, and replace the module to modify the contents of an existing file.
- Database : Database module helps in working with databases such as mongodb, mysql, mssql, postgresql, proxysql and vertica to add or remove databases or modifying database configurations, etc.
- Cloud : The Cloud section has a vast collection of modules for different cloud providers like Amazon, Azure, Google, Docker, VMware, Digital Ocean, Openstack, and many more. There are number a of modules available of each of these that allow you to perform various tasks such as, creating and destroying instances, performing configuration changes, security, managing containers, clusters, and much more.
- Windows : Windows module helps you in the Windows environment. Some of them are, Win_copy to copy files, Win_command to execute a command, configuring a domain, configuring IIS, configuring registry, and lot more.
These are just a few modules in a few categories. There are lots more and a comprehensive list can be found at Ansible Doc along with detailed instructions on each of them.
Working with Ansible Modules
Let’s have a look at some of the most popular Ansible modules and their usage through practical examples.
Setup Module
The setup module is used to get the information about the network or hardware or OS version or memory-related information of the target machines.
On the Ansible Control machine, change the directory to Ansible_project and run the following command:
1 | ansible target1 -m setup -i inventory.txt |
You should get the system-related information of the Target1 machine in the following output:
01 02 03 04 05 06 07 08 09 10 11 12 13 14 15 16 17 18 19 20 21 | target1 | SUCCESS => { "ansible_facts": "ansible_all_ipv4_addresses": [ "192.168.0.11", ], "ansible_all_ipv6_addresses": [ "fe80::200:2dff:fe3a:20b3", "fe80::200:aff:fe3a:20b3" ], "ansible_apparmor": { "status": "disabled" }, "ansible_architecture": "x86_64", "ansible_bios_date": "04/01/2014", "ansible_bios_version": "1.10.2-1ubuntu1", "ansible_cmdline": { "BOOT_IMAGE": "(hd0,msdos1)/boot/vmlinuz-4.18.0-147.5.1.el8_1.x86_64", "console": "tty0", "ro": true, "root": "UUID=b9682000-d932-4e30-b163-08088e215a03" }, |
Command Module
The command module is used to executes a specific command on the target machine and display the output.
Let’s see some examples:
1 | ansible target1 -m command -a "free -m" -i inventory.txt |
You should get the memory related information of the Target1 machine in the following output:
1 2 3 4 | target1 | CHANGED | rc=0 >> total used free shared buff/cache availableMem: 1989 250 1224 8 513 1571Swap: 0 0 0 |
To get the disk-related information of the Target1 machine, run the following command:
1 | ansible target1 -m command -a "fdisk -l" -i inventory.txt |
You should get the disk-related information of the Target1 machine in the following output:
01 02 03 04 05 06 07 08 09 10 | target1 | CHANGED | rc=0 >>Disk /dev/sda: 80 GiB, 85899345920 bytes, 167772160 sectorsUnits: sectors of 1 * 512 = 512 bytesSector size (logical/physical): 512 bytes / 512 bytesI/O size (minimum/optimal): 512 bytes / 512 bytesDisklabel type: dosDisk identifier: 0x7e9dbe13Device Boot Start End Sectors Size Id Type/dev/sda1 2048 167770112 167768065 80G 83 Linux |
Shell Module
You can use the shell module to execute any command in the shell of your choice. The shell module commands are run in /bin/sh shell and you can use the operators like >, | and even environment variables with shell module.
For example, run the “free -m” command on the Target1 machine and store its output to the file memory.txt:
1 | ansible target1 -m shell -a 'free -m > memory.txt' -i inventory.txt |
You can now view the content of the memory.txt file created on the Target1 machine using the following command:
1 | ansible target1 -m command -a 'cat memory.txt' -i inventory.txt |
You should see the following output:
1 2 3 4 | target1 | CHANGED | rc=0 >> total used free shared buff/cache availableMem: 1989 251 1223 8 514 1571Swap: 0 0 0 |
User Module
The user module is used to create and delete the user account in your system.
Example 1 : Create a New User
Before creating a new user, you will need to create a hashed password for this module to work properly.
You can generate a hashed password with the following command:
1 | ansible all -i localhost, -m debug -a "msg={{ 'yourpassword' | password_hash('sha512', 'mysecretsalt') }}" |
You should see the following output:
1 2 3 | localhost | SUCCESS => { "msg": "$6$mysecretsalt$qJbapG68nyRab3gxvKWPUcs2g3t0oMHSHMnSKecYNpSi3CuZm.GbBqXO8BE6EI6P1JUefhA0qvD7b5LSh./PU1"} |
Now, use the password from the above output and create a new user named hitesh for the Target1 machine using the command below:
1 | ansible target1 -m user -a 'name=hitesh password=$6$mysecretsalt$qJbapG68nyRab3gxvKWPUcs2g3t0oMHSHMnSKecYNpSi3CuZm.GbBqXO8BE6EI6P1JUefhA0qvD7b5LSh./PU1' -i inventory.txt |
You should see the following output:
01 02 03 04 05 06 07 08 09 10 11 12 13 14 15 16 | target1 | CHANGED => { "ansible_facts": { "discovered_interpreter_python": "/usr/libexec/platform-python" }, "changed": true, "comment": "", "create_home": true, "group": 1002, "home": "/home/hitesh", "name": "hitesh", "password": "NOT_LOGGING_PASSWORD", "shell": "/bin/bash", "state": "present", "system": false, "uid": 1002} |
Example 2 : Delete the User
To delete the user hitesh, run the following command:
1 | ansible target1 -m user -a 'name=hitesh state=absent' -i inventory.txt |
You should see the following output:
01 02 03 04 05 06 07 08 09 10 | target1 | CHANGED => { "ansible_facts": { "discovered_interpreter_python": "/usr/libexec/platform-python" }, "changed": true, "force": false, "name": "hitesh1", "remove": false, "state": "absent"} |
Options: state=absent to delete the user
File Module
The file module is used to create files, directories and set or change the permissions and ownership of them.
Example 1 : Create a File
To create a new file named file1.txt on the Target1 machine inside /opt/ directory with permission=755 and ownership=root run the following command:
1 | ansible target1 -m file -a 'dest=/opt/file1.txt state=touch mode=755 owner=root group=root' -i inventory.txt |
You should see the following output:
01 02 03 04 05 06 07 08 09 10 11 12 13 14 | target1 | CHANGED => { "ansible_facts": { "discovered_interpreter_python": "/usr/libexec/platform-python" }, "changed": true, "dest": "/opt/file1.txt", "gid": 0, "group": "root", "mode": "0755", "owner": "root", "size": 0, "state": "file", "uid": 0} |
Example 2 : Create a Directory
To create a directory named dir1 on the Target1 machine inside /opt/ directory with permission=755, run the following command:
1 | ansible target1 -m file -a 'dest=/opt/dir1 state=directory mode=755' -i inventory.txt |
You should see the following output:
01 02 03 04 05 06 07 08 09 10 11 12 13 14 | target1 | CHANGED => { "ansible_facts": { "discovered_interpreter_python": "/usr/libexec/platform-python" }, "changed": true, "gid": 0, "group": "root", "mode": "0755", "owner": "root", "path": "/opt/dir1", "size": 6, "state": "directory", "uid": 0} |
Options:
dest : It is the absolute path of the directory to be created.
state : You should provide the value as ‘directory.’ By default, the value is ‘file’.
Example 3 : Delete a File
To delete a file named file1.txt on the Target1 machine inside /opt/ directory, run the following command:
1 | ansible target1 -m file -a "dest=/opt/file1.txt state=absent" -i inventory.txt |
You should see the following output:
1 2 3 4 5 6 7 8 | target1 | CHANGED => { "ansible_facts": { "discovered_interpreter_python": "/usr/libexec/platform-python" }, "changed": true, "path": "/opt/file1.txt", "state": "absent"} |
Example 4 : Delete a Directory
To delete a directory named dir1 on the Target1 machine inside /opt/ directory, run the following command:
1 | ansible target1 -m file -a "dest=/opt/dir1 state=absent" -i inventory.txt |
You should see the following output:
1 2 3 4 5 6 7 8 | target1 | CHANGED => { "ansible_facts": { "discovered_interpreter_python": "/usr/libexec/platform-python" }, "changed": true, "path": "/opt/dir1", "state": "absent"} |
Options:
dest : Path of the directory you want to delete.
state=absent to delete the user.
Copy Module
The copy module is used to copying files to the single or multiple Target machines.
Example:
To copy a file named fstab from the Ansible Controller machine to the Target1 machine, run the following command:
1 | ansible target1 -m copy -a "src=/etc/fstab dest=/mnt/" -i inventory.txt |
You should see the following output:
01 02 03 04 05 06 07 08 09 10 11 12 13 14 15 16 17 | target1 | CHANGED => { "ansible_facts": { "discovered_interpreter_python": "/usr/libexec/platform-python" }, "changed": true, "checksum": "edb7819f241fd372eec0f0d65b71a91c699caba6", "dest": "/mnt/fstab", "gid": 0, "group": "root", "md5sum": "427f73ddf0ca0710e055d9556ae07a6b", "mode": "0644", "owner": "root", "size": 427, "src": "/root/.ansible/tmp/ansible-tmp-1594986570.4586592-11244-194669821629147/source", "state": "file", "uid": 0} |
Manage Software Packages
The yum module is a very useful Ansible module that is used to install and remove software packages in RHEL/CentOS/Fedora operating systems.
Example 1 : Install HTTP Server
To install the HTTP server in your Target1 machine, run the following command:
1 | ansible target1 -m yum -a "name=httpd state=present" -i inventory.txt |
Once the above command executed successfully, you should get the following output:
01 02 03 04 05 06 07 08 09 10 11 12 13 14 15 16 17 18 19 | target1 | CHANGED => { "ansible_facts": { "discovered_interpreter_python": "/usr/libexec/platform-python" }, "changed": true, "msg": "", "rc": 0, "results": [ "Installed: apr-1.6.3-9.el8.x86_64", "Installed: apr-util-1.6.1-6.el8.x86_64", "Installed: apr-util-bdb-1.6.1-6.el8.x86_64", "Installed: httpd-2.4.37-21.module_el8.2.0+382+15b0afa8.x86_64", "Installed: httpd-filesystem-2.4.37-21.module_el8.2.0+382+15b0afa8.noarch", "Installed: mod_http2-1.11.3-3.module_el8.2.0+307+4d18d695.x86_64", "Installed: httpd-tools-2.4.37-21.module_el8.2.0+382+15b0afa8.x86_64", "Installed: apr-util-openssl-1.6.1-6.el8.x86_64", "Installed: centos-logos-httpd-80.5-2.el8.noarch" ]} |
Options:
state=present :- This option will check whether the package is installed or not on the Target1 machine. If the package is not installed it will install the latest version.
Example 2 : Update HTTP Server
To update the HTTP server package in your Target1 machine to the latest version, run the following command:
1 | ansible target1 -m yum -a "name=httpd state=latest" -i inventory.txt |
Once the above command executed successfully, you should get the following output:
1 2 3 4 5 6 7 8 9 | target1 | SUCCESS => { "ansible_facts": { "discovered_interpreter_python": "/usr/libexec/platform-python" }, "changed": false, "msg": "Nothing to do", "rc": 0, "results": []} |
Options:
state=latest :- This option will update the package to the latest version if it’s not of the latest available version.
Example 3 : Remove HTTP Server
To remove the HTTP server package from your Target1 machine. run the following command:
1 | ansible target1 -m yum -a "name=httpd state=absent" -i inventory.txt |
You should get the following output:
01 02 03 04 05 06 07 08 09 10 11 12 | target1 | CHANGED => { "ansible_facts": { "discovered_interpreter_python": "/usr/libexec/platform-python" }, "changed": true, "msg": "", "rc": 0, "results": [ "Removed: httpd-2.4.37-21.module_el8.2.0+382+15b0afa8.x86_64", "Removed: mod_http2-1.11.3-3.module_el8.2.0+307+4d18d695.x86_64" ]} |
Options:
state=absent :- This will remove the specified package from the system.
state=latest :- This will update the specified package to the latest version.
state=present :- This will install the specified package in the Target system.
Service/Systemd Module
This module is used to start, stop and restart the services in single or multiple target machines.
Example 1 : Starting a Service
Before starting, make sure the httpd package must be installed on the Target1 machine.
To start a httpd service on the Target1 machine, run the following command:
1 | ansible target1 -m service -a "name=httpd state=started" -i inventory.txt |
Or
1 | ansible target1 -m systemd -a "name=httpd state=started" -i inventory.txt |
Options:
state=started : This option will start the httpd service on the Target1 machine only if it is not already started otherwise it will not run command. It is also known as idempotent actions that will not run commands unless necessary.
Example 2 : Stopping a Service
To stop a httpd service on the Target1 machine, run the following command:
1 | ansible target1 -m service -a "name=httpd state=stopped" -i inventory.txt |
Options:
state=stopped : This option will stop the httpd service on the Target1 machine only if it is running otherwise it will not run command.
Example 3 : Restarting a Service
To restart a httpd service on the Target1 machine, run the following command:
1 | ansible target1 -m service -a "name=httpd state=restarted" -i inventory.txt |
Script Module
The script module executes a local script on one or more remote machines after transferring it. To run a script on one or hundreds of servers you really don’t have to copy it to over all the servers, Ansible takes care of automatically copying the script to the remote servers and then executing it on the remote servers.
Example:
To run a test.sh script on the Target1 machine, run the following command:
1 | ansible target1 -m script test.sh -i inventory.txt |
Note : The test.sh script must be available on the Ansible Controller machine inside Ansible_project directory.
Ansible Module Exercise
Now go ahead and get your hands dirty developing some Ansible playbooks using the Ansible modules we learned above. We will just go to get you familiar with advanced playbooks and playbook structure.
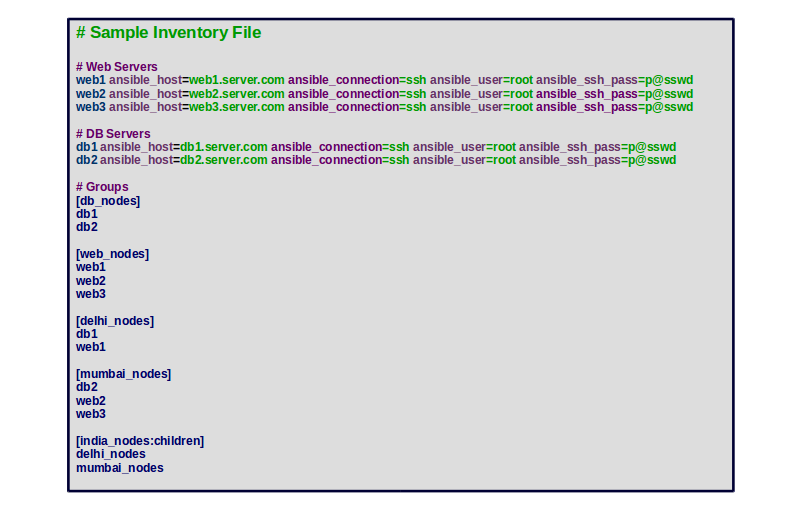
Use the inventory file shown in the below image and solve the following exercises:
Exe 1 :- Create a file named test.txt inside /opt directory on the Target machines as mentioned in the inventory file and web_nodes group.
Ans : Create a playbook.yml file inside the Ansible_project directory using the following command:
1 2 | cd Ansible_projectnano playbook.yml |
Add the following contents:
1 2 3 4 | - hosts: web_nodes tasks: - name: Create a file file: path=/opt/test.txt state=touch |
Save and close the file then run the playbook with the following command:
1 | ansible-playbook playbook.yml -i inventory.txt |
Exe 2 :- Create a directory named dir1 inside /opt directory with permission as 775 owner/group as root on the Target machines as mentioned in the inventory file and web_nodes group.
Ans : Create a new playbook.yml file inside the Ansible_project directory using the following command:
1 2 | cd Ansible_projectnano playbook.yml |
Add the following contents:
1 2 3 4 | - hosts: web_nodes tasks: - name: Create directory file: path=/opt/dir1 state=directory mode=775 owner=root group=root |
Save and close the file then run the playbook with the following command:
1 | ansible-playbook playbook.yml -i inventory.txt |
Note : Click here for more information about the file module.
Exe 3 :- Start and enable httpd service on web_nodes group and nginx service on db_nodes group as mentioned in the inventory file.
Ans : Create a new playbook.yml file inside the Ansible_project directory using the following command:
1 2 | cd Ansible_projectnano playbook.yml |
Add the following contents:
1 2 3 4 5 6 7 8 9 | - hosts: web_nodes tasks: - name: Start httpd service systemd: name=httpd state=started enabled=yes- hosts: db_nodes tasks: - name: Start nginx service systemd: name=nginx state=started enabled=yes |
Save and close the file then run the playbook with the following command:
1 | ansible-playbook playbook.yml -i inventory.txt |
Note : Click here for more information about systemd module.
Exe 4 :- Create a new user named user1 with password=hashed-password, home-directory=/home/user1, shell=/bin/bash on web_nodes group as mentioned in the inventory file.
Ans : Create a new playbook.yml file inside the Ansible_project directory using the following command:
1 2 | cd Ansible_projectnano playbook.yml |
Add the following contents:
1 2 3 4 | - hosts: web_nodes tasks: - name: Create a new user user: name=user1 password=hashed-password home=/home/user1 shell=/bin/bash state=present |
Save and close the file then run the playbook with the following command:
1 | ansible-playbook playbook.yml -i inventory.txt |
Exe 5 :- Create a new user named staff1 with password=hashed-password, home-directory=/var/www/, shell=/bin/bash and appending the group “apache” to the user’s groups on web_nodes group as mentioned in the inventory file.
Ans : Create a new playbook.yml file inside the Ansible_project directory using the following command:
1 2 | cd Ansible_projectnano playbook.yml |
Add the following contents:
1 2 3 4 | - hosts: web_nodes tasks: - name: Create a new user user: name=staff1 password=hashed-password home=/var/www/staff1 shell=/bin/bash groups=apache append=yes state=present |
Save and close the file then run the playbook with the following command:
1 | ansible-playbook playbook.yml -i inventory.txt |
Note : Click here for more information about the user module.
Exe 6 : Install httpd package on web_nodes and remove Nginx package from the db_nodes group.
Ans : Create a new playbook.yml file inside the Ansible_project directory using the following command:
1 2 | cd Ansible_projectnano playbook.yml |
Add the following contents:
01 02 03 04 05 06 07 08 09 10 11 | - name: Install httpd package on web_nodes hosts: web_nodes tasks: - name: Install httpd package yum: name=httpd state=latest- name: Remove Nginx package on db_nodes hosts: db_nodes tasks: - name: Remove Nginx package yum: name=nginx state=absent |
Save and close the file then run the playbook with the following command:
1 | ansible-playbook playbook.yml -i inventory.txt |
Options:
present : This option will simply ensure that the desired package is installed.
latest : This option will install and update the specified package if it’s not of the latest available version.
absent : This option will remove the specified package.
Note : Click here for more information about the yum module.
Exe 7 : Add the line “nameserver 8.8.8.8” in /etc/resolv.conf file on the web_nodes group.
Ans : Create a new playbook.yml file inside the Ansible_project directory using the following command:
1 2 | cd Ansible_projectnano playbook.yml |
Add the following contents:
1 2 3 4 5 | - name: Update line in resolv.conf file on web_nodes hosts: web_nodes tasks: - name: Update line in resolv.conf file lineinfile: path=/etc/resolv.conf line='nameserver 8.8.8.8' |
Save and close the file then run the playbook with the following command:
1 | ansible-playbook playbook.yml -i inventory.txt |
The above playbook will search for a line “nameserver 8.8.8.8” in /etc/resolv.conf file and add it if it does not exist.
Exe 8 : Add a new line to the start and end of the file /etc/resolv.conf on the web_node group.
Ans : Create a new playbook.yml file inside the Ansible_project directory using the following command:
1 2 | cd Ansible_projectnano playbook.yml |
Add the following contents:
1 2 3 4 5 6 7 | - name: Add a new line to the start of the file resolv.conf web_nodes hosts: web_nodes tasks: - name: Add a new line to the start of the file resolv.conf. lineinfile: path=/etc/resolv.conf line='nameserver=4.4.4.4' insertbefore=BOF - name: Add a new line to the end of the file resolv.conf. lineinfile: path=/etc/resolv.conf line='nameserver=8.8.4.4' |
Save and close the file then run the playbook with the following command:
1 | ansible-playbook playbook.yml -i inventory.txt |
Exe 9 : Add a new line “nameserver 192.168.0.1” in /etc/resolv.conf file just after the last occurrence of a pattern (nameserver) on the web_nodes group.
Ans : Create a new playbook.yml file inside the Ansible_project directory using the following command:
1 2 | cd Ansible_projectnano playbook.yml |
Add the following contents:
1 2 3 4 5 | - name: Add a new line after the matching pattern/line hosts: web_nodes tasks: - name: Add a new line "nameserver 192.168.0.1" after the pattern nameserver in the file resolv.conf. lineinfile: path=/etc/resolv.conf line='nameserver=192.168.0.1' insertafter=nameserver |
Save and close the file then run the playbook with the following command:
1 | ansible-playbook playbook.yml -i inventory.txt |
Exe 10 : Add a new line “192.168.0.10 linuxbuz.com” in /etc/hosts file just before the pattern “example.com” on the web_nodes group.
Ans : Create a new playbook.yml file inside the Ansible_project directory using the following command:
1 2 | cd Ansible_projectnano playbook.yml |
Add the following contents:
1 2 3 4 5 | - name: Add a new line before the matching pattern/line. hosts: web_nodes tasks: - name: Add a new line "192.168.0.10 linuxbuz.com" before the pattern example.com in the file /etc/hosts. lineinfile: path=/etc/hosts line='192.168.0.10 linuxbuz.com' insertbefore=example.com |
Save and close the file then run the playbook with the following command:
1 | ansible-playbook playbook.yml -i inventory.txt |
Click here for more information about the lineinfile module.
Exe 11 : Find the string linuxbuz.com and replace it with example.com in /etc/hosts file on web_nodes group.
Ans : Create a new playbook.yml file inside the Ansible_project directory using the following command:
1 2 | cd Ansible_projectnano playbook.yml |
Add the following contents:
1 2 3 4 5 | - name: Find and Replace the String on web_nodes. hosts: web_nodes tasks: - name: Replace the string linuxbuz.com with example.com. replace: path=/etc/hosts regexp='linuxbuz.com' replace='example.com' backup=yes |
Save and close the file then run the playbook with the following command:
1 | ansible-playbook playbook.yml -i inventory.txt |
Options:
regexp :- Regular expression to search the string you want.
backup :- Tell ansible to backup the file before making any changes. For case-insensitive search use the string (?i)linuxbuz.com.
Click here for more information about the replace module.
Once you are finished, you can proceed to the next chapter.