
What Is Ansible Playbook?
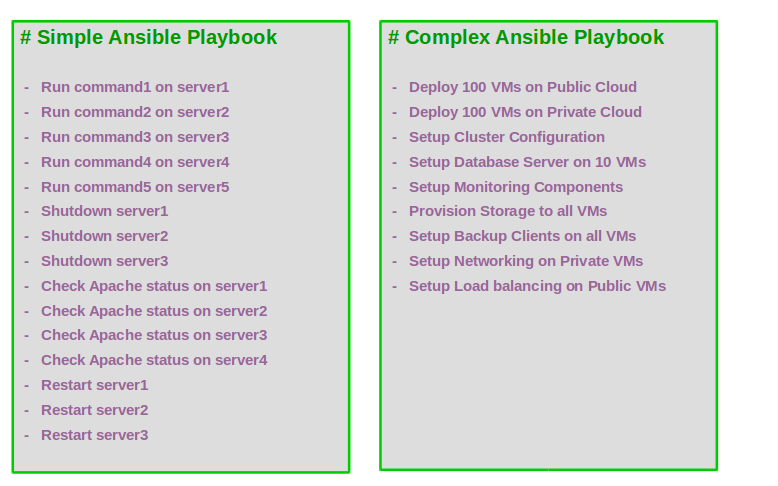
Ansible playbook or orchestration language, it is a playbook where we define what we want Ansible to do. It is a setup instruction you provide Ansible to work its magic. For example, it can be as simplest as running a series of commands on different servers in a sequence and restarting those servers in a particular order. Or it can be as complex as deploying hundreds of VMs in a Public and Private Cloud infrastructure, provisioning storage to all VMs, Setup network configuration on Private VMs, Configuring applications on them such as web server or database server, Setting load balancing, Installing and configuring backup client and many more:
How Playbooks Are Written?
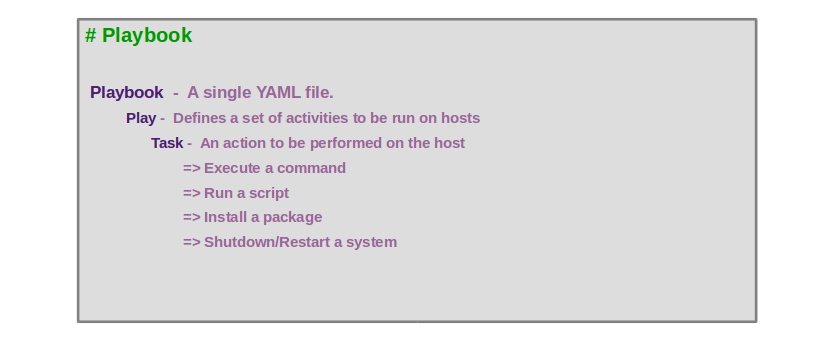
Let’s take a deeper look at how Ansible playbooks are written. Remember all playbooks are written in YAML format which is why we spend some time earlier getting our hands dirty with YAML. A playbook is a single YAML file containing a set of plays. A play defines a set of activities to be run on a single or group of hosts. A task is a single action to be performed on a host.
Some examples of a task are executing a command or script on a host, installing a package on a host, or performing shutdown or restart operation on the host.
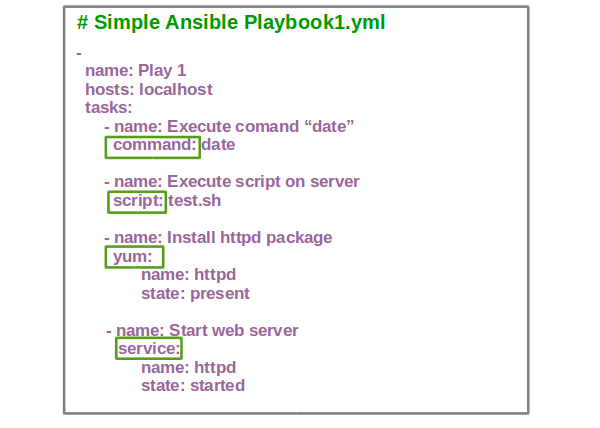
Let’s take a look at an actual playbook shown in the following screen.

It is a simple playbook that contains a single Play named Play 1. The call of this Play is to run a setup activities one after the other on the localhost. Remember that the hosts you want to run these actions are defined at the Play level. In this case, we just want to test on the localhost which is why is set localhost. This could be anything from your inventory file. So basically a Play defines what action you want to do on what host. All tasks listed under this particular Play will be executed against those hosts and those hosts could be any number of hosts or in this case it just localhost.
Next, we run a setup commands one after the other on the host. First, we print the date then we run a script on the server followed by installing the httpd package using the yum module and finally starting the webserver using the service module.
Now, if you don’t understand what each of these tasks does exactly and how it is defined? don’t worry we will going to take a better look at each of these.
Let’s look at this sample playbook format and try to related to what we learned in the YAML section earlier.
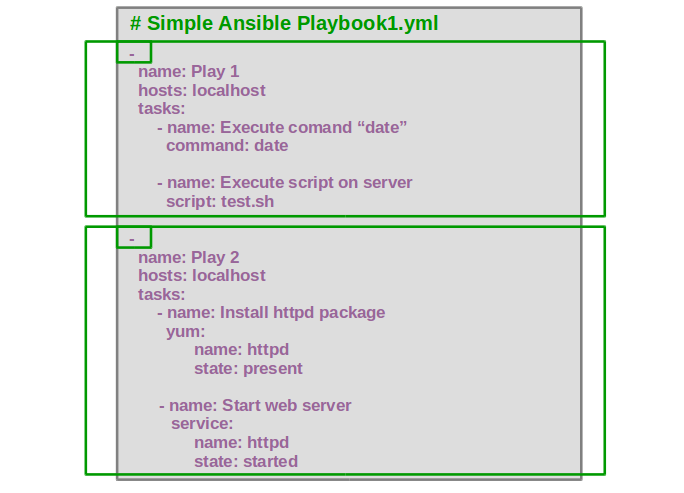
I have made a minor change and split the list of tasks in the two separate Plays. The YAML file which is our playbook contains a list of two plays. This is denoted by the “-“. So the “-“ indicates that it is an item in the list. So the playbook is a list of dictionaries in YAML terms. Each play is a dictionary and has setup properties called name, hosts and tasks. Remember these are properties of a dictionary and so the order does not really matter.
So even if you swap the position of naame and host is still a valid play. However, this not the same for tasks, the tasks as you can see is a list and are denoted by “-“. Lists are ordered collection so the position of the entries matter. If you swap the position of the entries like, “start the web server first before installing httpd package” which is not the desired solution. So the YAML format is key while developing playbook. You must pay extra attention to the intention and structure of this file.
Let’s take a look at this sample playbook shown in the following screen for understanding hosts parameter.
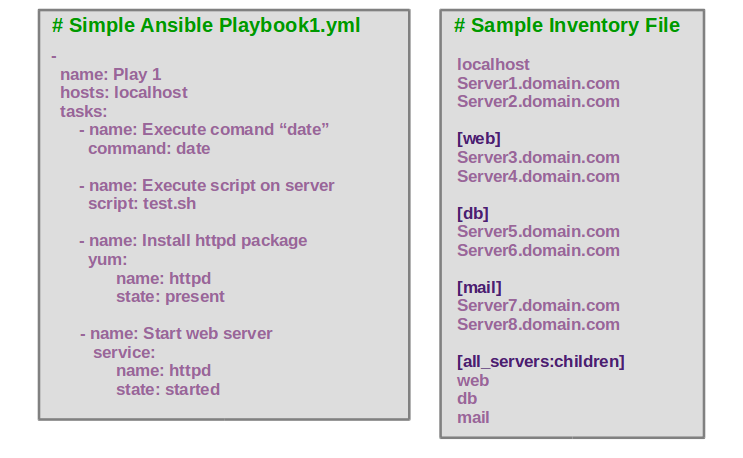
The hosts parameter indicates which hosts you want to run these operations on. Remember the host you want to perform these operations against is always set at a Play level. Currently, this is set at localhost which means that all these actions listed under the tasks are going to be performed on the localhost. You could have any hosts or group specified here but you must ensure that the host or group is first defined in the inventory file we created earlier
The hosts defined in the inventory file must match the hosts used in the playbook and all connection information for the host is retrieved from the inventory file. There is no hard rule to use all the hosts defined in the inventory file. You could choose one or multiple, or a group or multiple groups from the inventory file in the Play. But you really don’t have to use all of them whatever host you defined in the Play in the playbook should be defined in the inventory file. Otherwise its not going to run.
Let’s look at what a module is? You should see the following screen:
The different actions run by tasks are called modules. In this case, command, script, yum, and service are all Ansible modules. There are hundreds of other modules available out of the box. Information about these modules is available in the Ansible documentation website or you could simply run the command “ansible-doc -l” on your Ansible system.
How to Run Ansible Playbook?
To get familiar with the basic playbook structures in the upcoming exercises. You simply need to know the command module. If you look at the command module, you will see that you could simply specify the command you wish to run, in this case, “date” and Ansible will execute that command on that particular server.
Finally, once you successfully build the Ansible playbook, how do you run it? It is very simple. Execute the “ansible-playbook” command and specify the name of the Ansible playbook and inventory file you just created.
The basic syntax to run the Ansible playbook is shown below:
1 | ansible-playbook playbook-file.yml -i inventory-file |
For more information about the ansible-playbook command, use the following command:
1 | ansible-playbook --help |
Ansible Playbook Example
Now go ahead and get your hands dirty developing some Ansible playbook in coding exercises. We will just be going to get you familiar with the basic playbook and playbook structure. The whole idea is to get familiar with how a Plays are defined and what it is and how tasks are defined and to understand the difference between them. We will focus on more realistic used cases in the upcoming chapter. But for now, we will stack with real basics.
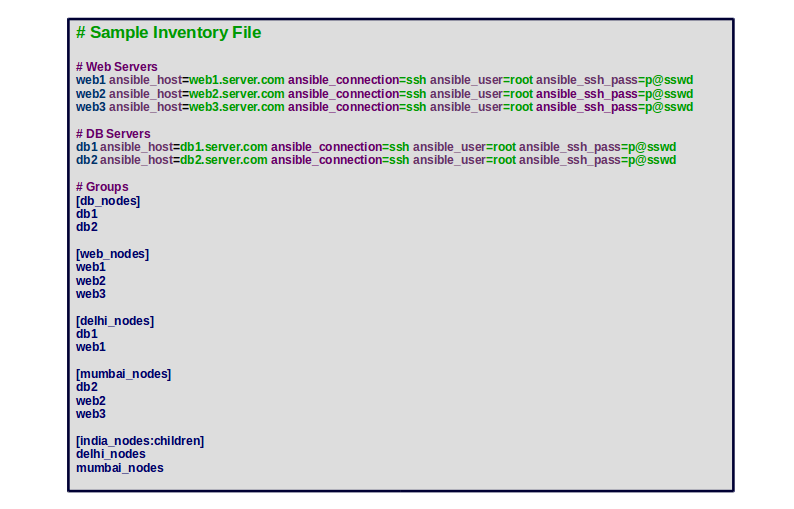
=> Use the following inventory file and solve the exercises in the ansible playbook example as shown below:
Question 1 :- Create an Ansible playbook with the following details:
Task1 : Execute a command to display fstab file on all webservers
Command : cat /etc/fstab
Task2 : Execute a command to display memory usage on all webservers.
Command : free -m
Solution :-
In this Ansible playbook example, you will need to create two tasks for each command. You can create your playbook with the following command:
1 | nano playbook.yml |
Add the following content:
01 02 03 04 05 06 07 08 09 10 | ## Ansible playbook examples - name: 'Execute two commands on all webservers' hosts: web_nodes tasks: - name: 'Execute a command to display fstab file on all webservers' command: 'cat /etc/fstab' - name: 'Execute a command to display memory usage on all webservers' command: 'free -m' |
Question 2 :- Create an Ansible playbook with the following details:
Task1 : Execute a command to display disk size on all webservers
Command : df -h
Task2 : Execute a command to display hosts on all DB servers.
Command : cat /etc/hosts
Solution :-
In this Ansible playbook example, you will need to create two tasks.
1 | nano playbook.yml |
Add the following content:
01 02 03 04 05 06 07 08 09 10 11 12 13 14 15 | ## Ansible playbook examples - name: 'Execute a command on all webservers' hosts: web_nodes tasks: - name: 'Execute a command to display disk size on all webservers' command: 'df -h' - name: 'Execute a command on all DB servers' hosts: db_nodes tasks: - name: 'Execute a command to display hosts on all DB servers' command: 'cat /etc/hosts' |
Question 3 :- Create an Ansible playbook with the following details:
Task1 : Restart MySQL service on all DB servers.
Command : service mysql restart
Task2 : Restart httpd service on all webservers.
Command : service httpd restart
Task3 : Restart all webservers and DB servers at once
Command : /sbin/shutdown -r
Solution :-
In this Ansible playbook example, you will need to create three tasks.
1 | nano playbook.yml |
Add the following content:
01 02 03 04 05 06 07 08 09 10 11 12 13 14 15 16 17 18 19 20 21 22 23 | ## Ansible playbook example - name: 'Restart MySQL service on all DB servers' hosts: db_nodes tasks: - name: 'Restart MySQL service on all DB servers' command: 'service mysql restart' - name: 'Restart httpd service on all webservers' hosts: web_nodes tasks: - name: 'Restart httpd service on all webservers' command: 'systemctl restart httpd'- name: 'Restart all webservers and DB servers at once' hosts: india_nodes tasks: - name: 'Restart all webservers and DB servers at once' command: '/sbin/shutdown -r' |
LAB – Ansible Playbook
In this lab, we will be going to see two ways of running Ansible, using the Ansible command, and then using the ansible-playbook command.
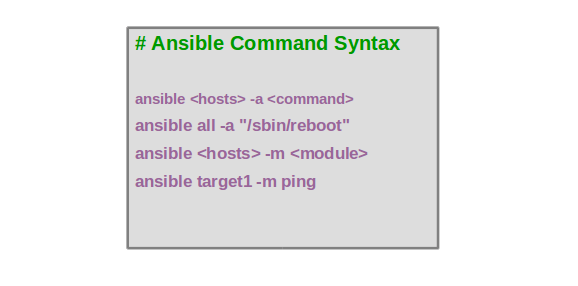
Sometimes you may want to use ansible command for one of the tasks such as test connectivities between the Ansible Controller and the Targets or run a command to shut down a set of servers.
In that case, you can get away without writing a playbook by running ansible command followed by the hosts and the command to reboot the hosts. We also used this ansible command in the previous lab to use the ping module to test connectivity to the Target servers. We will learn about modules in the upcoming chapter but checkout the syntax here.
So this is an imperative style of execution. There are no playbooks involve. You are running separate ansible commands for each operation. So this is not an ideal use-case of ansible unless you wish to use it for the exception of cases. The real usage of ansible is with playbooks. In the previous chapter, we learned about playbooks. We will now use the ansible-playbook command to execute those playbooks.
We will now perform a simple test to check the connectivity between the Ansible Controller and Target machines with ansible command and ansible-playbook command.
On the Ansible Controller machine, change the directory to Ansible-playbook and create a new inventory.txt file:
1 2 | cd Ansible-playbooknano inventory.txt |
Add your Target1 and Target2 machine details as shown below:
1 2 | target1 ansible_host=192.168.0.11 ansible_user=root ansible_ssh_pass=admin@123target2 ansible_host=192.168.0.12 ansible_user=root ansible_ssh_pass=admin@123 |
Save and close the file when you are finished.
Now we are going to use the ansible command and see how we can execute a module only by using ansible command without a playbook.
Now we are going to run ansible followed by the hostname that we want to target, we can either use Target1, Target2 or if you have a group as we learned in the Inventory lecture you can specify that as well. But in this case, we have not created any group in inventory file however there is a group that Ansible creates by default and that’s called “all” group and the all group simply means that its a built-in group that ansible creates and it has all the servers in our inventory file. So if you look at the inventory file you won’t see at a group named “all” but Ansible create it internally.
1 | ansible all -m ping -i inventory.txt |
You come back with a message that the pings are successful and ansible is able to establish connectivity to the target servers:
01 02 03 04 05 06 07 08 09 10 11 12 13 14 | target2 | SUCCESS => { "ansible_facts": { "discovered_interpreter_python": "/usr/libexec/platform-python" }, "changed": false, "ping": "pong"}target1 | SUCCESS => { "ansible_facts": { "discovered_interpreter_python": "/usr/libexec/platform-python" }, "changed": false, "ping": "pong"} |
Note: Both ansible and ansible-playbook commands require an inventory file specified by -i parameter.
Now look at the second way and for this, we need to create a file named playbook.yml inside Ansible_project directory.
1 | nano playbook.yml |
Add the following content:
1 2 3 4 5 | # ansible playbook examples - hosts: all name: "Test connectivity to target servers" tasks: - ping: |
Save and close the file when you are finished.
Now we have two files in the current directory an inventory file and a playbook file.
To execute the playbook, run the ansible-playbook command by specifying playbook.yml and inventory.txt file:
1 | ansible-playbook playbook.yml -i inventory.txt |
You can see the information about the first Play and the tasks inside the Play then finally the summary of the execution and tasks of both hosts.
01 02 03 04 05 06 07 08 09 10 11 12 13 | PLAY [Test connectivity to target servers] ****************************************************************************************************TASK [Gathering Facts] ************************************************************************************************************************ok: [target1]ok: [target2]TASK [ping] ***********************************************************************************************************************************ok: [target1]ok: [target2]PLAY RECAP ************************************************************************************************************************************target1 : ok=2 changed=0 unreachable=0 failed=0 skipped=0 rescued=0 ignored=0 target2 : ok=2 changed=0 unreachable=0 failed=0 skipped=0 rescued=0 ignored=0 |
Note: Click here to check the syntax of the playbook.yml file.
Once you are finished, you can proceed to the next chapter.